
These days, it is easy to find curated lists of AI tools for designers, galleries of generated illustrations, and endless libraries of prompts. What is much harder to find is a clear picture of how AI is actually integrated into the everyday workflow of a product designer — not for experiments, but for real, meaningful results.
We have gone through this journey ourselves: testing AI across the main stages of the design process, from ideation and prototyping to visual design and user research. Along the way, we developed a simple, repeatable workflow that has significantly increased our productivity.
In this article, we will share what already works and discuss the most common objections we have encountered — many of which we have experienced ourselves.
Stage 1: Ideation without clichés
Objection: “Whenever I ask AI to suggest ideas, I get a list of clichés. It cannot produce the kind of creative thinking expected from a product designer.”
This is a valid point. AI does not know the specifics of your product, the full context of the task, or countless other important nuances. The most obvious solution is to “feed” it all available documentation. But this is a common mistake, because it often leads to even worse results: the context gets flooded with irrelevant information, and the AI’s answers become vague and unfocused.
Current-generation models can technically process thousands of words, but the longer the input, the higher the risk that something important will be missed, especially content hidden in the middle. This is known as the “lost in the middle” problem.
To get meaningful results, AI does not just need more information — it needs the right information, presented in the right way. This is where RAG, or Retrieval-Augmented Generation, becomes useful.
How does RAG work?
Think of RAG as a smart assistant working with your personal document library. You upload your files, and the assistant reads each of them, creating a short summary — a set of tags, or semantic labels, covering the main topics, terms, scenarios, and concepts. These summaries are stored in a kind of “card index” called a vector database.
When you ask a question, the assistant does not reread every document from beginning to end. Instead, it compares your query with the tags, retrieves only the most relevant fragments, or chunks, and sends them to the language model so it can generate the final answer.
How is this different from simply dropping a document into a chat window?
Let’s explain in more detail:
Standard chat interaction
This is like asking an assistant to read a 100-page book from beginning to end every time you have a question. Technically, all the information is “in front of them”, but it is easy to miss something, especially if it is in the middle. That is exactly the “lost in the middle” problem.
The RAG approach
You ask your smart assistant a question, and it retrieves only the relevant pages, or fragments, from different documents. This is faster and more precise, but it introduces a few new risks:
- An ambiguous question. You ask, “How can we make the project safer?”, and the assistant brings you documents about cybersecurity instead of finance.
- Mixed fragments. One fragment might combine marketing, design, and engineering notes. This blurs the meaning, making it harder for the assistant to identify the main topic.
- A semantic gap. You ask: “How can we make the app faster?”, but the document says: “Optimise API response time.” To a human, the connection is obvious. To a machine, not always.

These are not reasons to avoid RAG or AI in general. Most of them can be avoided by preparing your knowledge base better and writing more precise prompts. So where should you start?
Start with three short, specific documents
These three short documents will give your AI assistant enough context to become genuinely useful:
- Product overview and scenarios. A short summary of what your product does and the main user scenarios.
- Target audience. Your key user segments and their core needs or goals.
- Research and experiments. Key insights from interviews, surveys, usability testing, or product analytics.
Each document should focus on one topic and ideally stay within 300–500 words. This makes retrieval easier and ensures that each retrieved fragment is semantically clean and highly relevant.
Language matters
In practice, RAG works best when both the query and the knowledge base are in English. We ran a small experiment to test this assumption using several different combinations:
- English query + English documents: Consistently accurate and relevant results.
- Non-English query + English documents: Quality dropped significantly. The AI struggled to match the query with the right content.
- Non-English query + non-English documents: The weakest result. Although large language models technically support multiple languages, their internal semantic maps are mostly trained in English. Vector search in other languages is far less reliable.
Conclusion: if you want your AI assistant to provide accurate, meaningful answers, do all RAG work in English — both the data and the queries. This advice applies specifically to RAG systems. For standard chat interactions, you can freely use other languages. This challenge is also highlighted in a 2024 study on multilingual information retrieval.
From outsider to team member: give AI the right context
When your AI assistant receives the right context, it stops behaving like an outsider and starts acting more like a team member who genuinely understands your product. With well-structured input, it can help identify blind spots in your thinking, challenge assumptions, and strengthen your ideas — much like a mid-level or senior designer would.
Here is an example prompt that works very well for us:
Your task is to perform a comparative analysis of two features: “Group Gift Contributions” (described in group_goals.txt) and “Personal Savings Goals” (described in personal_goals.txt).
The goal is to identify potential conflicts in logic, architecture, and user scenarios, and to propose visual and conceptual ways to clearly separate these two features in the user interface, so that users can easily understand the difference during real use.
Please include:
- If useful, include a comparison table with key parameters such as purpose, initiator, audience, contribution method, timing, access rights, and so on.
- Potential overlaps in user goals, actions, or scenarios;
- Possible confusion if both features are launched at the same time;
- Any architectural or business-level conflicts, such as roles, notifications, access rights, or financial logic;
- Suggestions for visual and conceptual separation: naming, colour coding, separate sections, or other UI/UX techniques;
- Onboarding screens or explanatory elements that would help users understand both features.
AI needs context, not just prompts
If you want AI to offer more than surface-level suggestions and become a real design partner, it needs the right context. Not just more information, but better, more structured information.
Building a useful knowledge base is not difficult. And you do not need a full RAG system to start. Many of these principles work even in a regular chat window: well-organised content and a clear question can dramatically improve the usefulness and relevance of AI responses. This is your first step in turning AI from a novelty into a practical tool in your product design workflow.
Stage 2: Prototyping and visual experiments
Objection: “AI only generates obvious solutions and cannot even create a proper user journey. It is faster to do it manually.”
This is a valid concern. AI is still weak at creating complete, usable screen sequences. But when creating individual elements — especially when exploring new interaction patterns or visual ideas — it can be surprisingly effective.
For example, we needed to prototype a gamified element for a limited-time promotion. The idea was to give users a lottery ticket they could “flip” to reveal a prize. We could not recreate the 3D animation we had in mind in Figma, either manually or with available plugins. So we described the idea to Claude 4 through Figma Make and, within minutes, without writing a single line of code, got exactly what we needed.
At the prototyping stage, AI can be a strong creative partner in two areas:
- Generating UI element ideas. It can generate dozens of interactive patterns, including ones you might not have thought of yourself.
- Generating micro-animations. It can quickly create polished animations that make a concept feel real, which is excellent for stakeholder presentations or as a reference for engineers.
AI can also be applied to multi-screen prototypes, but it is not as simple as dropping in a set of mockups and receiving a fully functioning sequence. The larger and more complex the project, the more refinement and manual correction it requires. Where AI already works well is in focused tasks — individual screens, elements, or animations — where it can kick-start the thinking process and save hours of trial and error.
A quick prototype of a gamified promotional banner UI, created with Claude 4 through Figma Make. No code or plugins needed.
Here is another valuable way to use AI in design — as a stress-testing tool. Back in 2023, Google Research introduced PromptInfuser, an internal Figma plugin that allowed designers to attach prompts directly to UI elements and simulate semi-functional interactions inside real mockups. Their goal was not to generate a new user interface, but to test how well AI could work inside existing layouts — inserting content into specific containers, handling edge cases, and exposing logic gaps early.
The results were striking: designers using PromptInfuser were up to 40% more effective at identifying UI issues and aligning the interface with real-world input — a clear increase in design accuracy, not just speed.
This strongly reflects our own experience with Claude 4 and Figma Make: when AI operates within a real interface structure rather than starting from a blank page, it becomes a much more reliable partner. It helps you test your ideas, not just generate them.
Stage 3: Finalising the interface and visual style
Objection: “AI cannot match our visual style. It is easier to just do it manually.”
This is one of the most common frustrations when using AI in design. Even if you upload your colour palette, fonts, and components, the results often do not look like they belong to your product. They tend to be either too decorative or too simplified.
And this is a real limitation. In our experience, today’s models still struggle to reliably apply a design system, even when you provide component structure or JSON files with your styles. We tested several methods:
- Direct integration with a component library. We used Figma Make with Claude and connected our library. This was the least effective method: although the AI tried to use the components, layouts were often broken and visuals were too conservative. Other designers have encountered similar issues, noting that library support in Figma Make is still limited and often unstable.
- Uploading styles as JSON. Instead of using the full component library, we tried uploading only exported styles — colours and fonts — in JSON format. The results improved: the layouts looked more modern, but the AI still made mistakes when applying the styles.
- A two-step method: structure first, style second. The best results came from separating the process. First, we asked AI to generate layout and composition without any styling. Once we had a solid structure, we gave it a second prompt: apply the correct styles from the same JSON file. This produced the most useful result — although it was still far from pixel-perfect.

So yes, AI still cannot help you finalise a user interface. It does not replace hands-on design work. But it is very useful in other ways:
- Quickly creating a visual concept for discussion.
- Generating “what if” alternatives for existing layouts.
- Exploring how your interface might look in a different style or direction.
- Acting as a second pair of eyes, providing feedback, pointing out inconsistencies or missed issues that you might overlook when tired or too deep in the work.
AI will not save you five hours of high-quality design time, because you will probably spend just as much time fixing its output. But as a visual sparring partner, it is already strong. If you treat it as a source of alternatives and fresh perspectives, it becomes a valuable creative collaborator.
Stage 4: Product feedback and analysis: AI as a thinking exoskeleton
Product designers have come a long way. We used to create interfaces in Photoshop based on predefined specifications. Later, we moved deeper into user experience (UX), mapping user journeys, conducting interviews, and understanding user behaviour. Now, with AI, we gain access to another layer: data analysis that used to belong almost exclusively to product managers and analysts.
As Vitaly Friedman rightly noted in one of his columns, trying to replace real UX interviews with artificial intelligence can lead to false conclusions, because models tend to generate an average experience rather than a real one. AI’s strength is not inventing data, but processing it at scale.
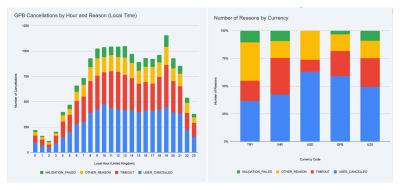
Here is a real example. We launched an exit survey for users who left our service. Within a week, we collected more than 30,000 responses in seven languages.
Simply calculating percentages for each of the five predefined reasons was not enough. We wanted to know:
- Is there a specific time of day when users are more likely to leave?
- Do reasons differ by region?
- Is there a relationship between user exits and system load?
The real challenge was figuring out which cuts and angles were even worth investigating. The entire technical process, from analysis to visualisations, was handled “for us” by Gemini running in Google Sheets. The whole task took us about two hours. Without AI, it would not only have taken much longer — we probably would not have been able to reach this level of insight at all.
AI allows you to work with large datasets almost in real time. But most importantly, it frees your time and energy for what truly matters: asking the right questions.
A few practical notes: Working with large datasets is still challenging for models without strong reasoning capabilities. In our experiments, we used Gemini integrated into Google Sheets and verified the results using ChatGPT o3. Other models, including the standalone Gemini 2.5 Pro, often produced incorrect results or simply refused to complete the task.
AI is not an autopilot. It is a co-pilot.
AI in design is only as good as the questions you ask. It does not do the work for you. It does not replace your thinking. But it helps you move faster, explore more possibilities, validate ideas, and focus on the difficult parts instead of wasting time on repetitive actions. Sometimes it is still faster to design manually. Sometimes it makes more sense to delegate a task to a junior designer.
But increasingly, AI is becoming the one that suggests, refines, and accelerates. Do not wait until you have built the perfect AI workflow. Start small. That may be the first real step in turning AI from a curiosity into a reliable tool in your product design process.
To sum up
- If you simply paste an entire document into a chat window, the model will often miss important things, especially those hidden in the middle. This is the “lost in the middle” problem.
- The RAG approach helps by retrieving only the most relevant fragments from your documents. This makes answers faster, more accurate, and grounded in real context.
- Clear, specific prompts work better. Narrow the scope, define the output, and use familiar terminology to help the model stay on track.
- A well-structured knowledge base makes a big difference. Organising content into short, topic-specific documents helps reduce noise and keep answers sharp.
- Use English for both prompts and documents. Even multilingual models are most reliable when working in English, especially in retrieval tasks.
- Most importantly: treat AI as a creative partner. It will not replace your skills, but it can spark ideas, identify issues, and speed up the boring parts.


.webp)
.webp)
.webp)
.webp)
.webp)